I love Mail Art or decorating envelopes however I hadn’t realised how niche this craft was until I received a decorated envelope through the mail while the chiropodist was here attending to hubby’s feet. She was most puzzled by the whole concept; just couldn’t understand why someone would bother to decorate an empty envelope!!
At Cardmaking Paradise recently we had Mail Art swap and some of our envelopes went winging overseas; always a nail-biting exercise hoping that the piece of art that has been posted abroad will arrive safely. One of my envelopes was posted to New Zealand and the other to a part of the UK; the one that went to NZ arrived at its destination before the UK one did!!
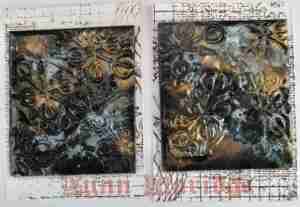
I used a C4 envelope, this is the front of the first one

and the back

Materials used;
Inks – Big and Juicy Mountain Meadow
Impress Chocolate
whispers Rio Purple, Royal Blue, Green Leaf
Distress Inks Chipped Sapphire, Broken China
Versamagic Hint of Pesto, Mango Madness, Persimmon
Memento Dandelion, Rose Bud, Northern Pine
Versafine Olympia Green, Vintage Sepia, Onyx Black
Stamps – Crafts Express
Cart-US birds on branch
Inkylicious Take Flight, Oriental Awakening
Craft Emotions Christmas Tree
PaperArtsy Plate HP1005
Oxford Impressions
Andy Skinner Back to Nature
KatzelKraft
Woodware Grasses BD232DE
Second Mail Art:

There is only the front of this second envelope as I deleted the blurred back image and forgot to take another picture! I certainly got carried away with both these envelopes; I must learn that less is more!!!
Materials Used;
Stencils – Dutch Doobadoo Spider Web
Memory Box Flower power
Imagination Crafts Flourishes & Mini Art
Stamps – Viva Decor Dandelion
Flourish (unknown)
Inks – Versafine Vintage Sepia, Onyx Black
Distress Inks Peacock Feathers, Picked Raspberry, Abandoned Coral, Cracked Pistachio
Fossilized Amber, Mermaid Lagoon, Seedless Preserves, Dusty Concord, Spiced Marmalade
Sakura Gel Pens
Thank you for looking x